Continuous Integration using GitHub Actions#
Overview
Questions:
How can we automate testing?
How do we link a repository on GitHub to continuous integration services?
Objectives:
Explain the concept and benefits of continuous integration.
Introduce the GitHub Marketplace as a one-stop shop for continuous integration services.
Demonstrate how to set up continuous integration using GitHub Actions.
Familiarize learners with YAML configuration files.
Follow Along with This Lesson
To follow along with this lesson, you can complete the previous lessons, or you can download a pre-made workshop repository that is at the starting point.
You will need to make sure that you have git installed and configured,
as described in the set-up instructions.
git clone https://github.com/MolSSI-Education/molecool.git
cd molecool
git checkout CI-Github-actions-start
git switch -c main
You can also download the pre-made workshop repository as a zip file.
If downloading as a zip file, you will need to initialize git in the repository and make an initial commit in order to use git.
Note - For this lesson, you must be able to push to GitHub. If you are using the pre-made repository, you will need to create an empty repository on GitHub, then change the remote URL to your own repository.
If you cloned using the command above, you will use the following command to change the remote URL:
git remote set-url origin YOUR_REPOSTIORY_LOCATION
From Wikipedia, continuous integration (CI) is the practice of merging all developers’ working copies of code to a shared mainline, several times a day. In other words, CI refers to the coupling of version control and unit testing in an automated way. Typically, CI runs either when you commit new code to your project, or beforehand, when you try to merge experimental code into the main repository (through a pull request). CI is useful not only for catching bugs before they reach your fellow developers and your end users but also for expanding your testing to platforms that are not available to you.
Most CI services are tightly integrated with GitHub. In this episode, we will be using GitHub Actions, because it is tightly integrated with GitHub and is free to use. Other options you might consider include CircleCI, Azure Pipelines, or Travis-CI.
Using any of these services is essentially getting access to empty remote computers that we can configure as we wish. To test our projects using GitHub Actions, we will have to set up the correct environment and tell our CI service what to do.
Setting up GitHub Actions#
All of GitHub Actions’ settings are stored in the file .github/workflows/CI.yaml.
Note the leading period on the .github folder, which makes this a hidden folder in Linux and Mac OS.
The .github file stores information that is relevant to GitHub in general.
For example, you will also see in this folder a file called CONTRIBUTING.md which contains contributing guidelines
(the information in this file is displayed to someone when they contribute to your project).
The file PULL_REQUEST_TEMPLATE.md is the file that gives the template that users see when they open a pull request on your repository.
If you wanted to change the template or contributing text, you would do so by editing these files.
Though not included with the CookieCutter, you can also have
an issue template.
Workflows for GitHub Actions are in .github/workflows in YAML files.
Fortunately for us, CookieCutter has created a file for us (CI.yaml) and set it up to run our tests with pytest.
GitHub has seen this folder and has been running tests on our repository every time we push to GitHub.
You might have noticed this, and you might have also noticed that our tests are not passing on GitHub despite passing locally.
We will address this soon.
First, let’s go over the file CI.yaml in detail so you can understand what is happening under the hood.
So far in this workshop, we have been working in the molecool/molecool and molecool/tests directories.
We will now focus on the CI.yaml file, in the .github/workflows, and on some other files in the molecool/devtools directory.
First, open the .github/workflows/CI.yaml file.
You will see something like the following at the top of the file:
name: CI

on:
  # GitHub has started calling the new repo's first branch "main" https://github.com/github/renaming
  # Existing codes likely still have "master" as the primary branch
  # Both are tracked here to keep legacy and new codes working
  push:
    branches:
      - "master"
      - "main"
  pull_request:
    branches:
      - "master"
      - "main"
  schedule:
    # Nightly tests run on master by default:
    #   Scheduled workflows run on the latest commit on the default or base branch.
    #   (from https://help.github.com/en/actions/reference/events-that-trigger-workflows#scheduled-events-schedule)
    - cron: "0 0 * * *"
Before we continue, the configuration file is written in YAML and adheres to a set of specifications.
YAML files are very often used in software development as configuration files.
For each service that uses a YAML, the general structure of the YAML file follows a specific format, but keywords will vary depending on the application.
Keywords like on, schedule, push, and pull_request are specific to GitHub Actions and indicate several steps of the entire CI process.
You can always refer to the documentation
for a list of all the available keywords and a more in-depth explanation of each one.
This first section of the file tells GitHub what events should trigger our workflows to run. In this section, we are specifying the action to run on pushes to the “main” branch or to the “master” branch. This is intended by the CookieCutter authors to catch both “main” and “master” since both are common as primary branches. If you wanted your CI to run on events to another branch, you would add the name here.
GitHub Actions also allows you to run workflows on a schedule.
The cookiecutter has set our workflows up to run nightly at midnight using the cron keyword.
GitHub Actions allows you to specify schedules or intervals for running CI jobs.
Next, we will tell GHA what “jobs” we want to be part of our workflow. To specify a job, we will need to specify the operating system on which the job will run, as well as other things like the Python version to use.
jobs:
  test:
    name: Test on ${{ matrix.os }}, Python ${{ matrix.python-version }}
    runs-on: ${{ matrix.os }}
    strategy:
      matrix:
        os: [macOS-latest, ubuntu-latest, windows-latest]
        python-version: [3.9, 3.10, 3.11]
In this section, we start specifying our jobs by using the “jobs” keyword.
Next, we give the job an ID (our ID here is “test”).
We are using a “matrix” strategy, meaning that the job “test” will run many times with all combinations of variables indicated in our matrix.
For our matrix, we are using two keywords called os and python-version.
It should be noted that we have made these keyword names up.
Adding keywords here with associated values just means that these are available as variables in the rest of our workflow.
To use variables in your GHA workflow you use the syntax ${{ variable_name }}.
You will see we have used the variables we defined in the matrix in the job name and to specify the operating system to run on the runs-on keyword in this section.
This is enough for us right now, but if you would want to specify exactly which versions of the operative systems you wanted to run your tests on, you could!
Next, we tell GitHub Actions the steps that are part of our workflow.
GitHub Actions are unique in that the CI is made up of different steps.
Steps may be custom code that you write, but, steps may also be modular, commonly used code blocks that have been made available to the community.
For example, many Python projects will need to install Miniconda to run.
GHA makes it possible for one person to write this step and share it, instead of everyone having to write their own implementation.
Some steps in Actions are modular and can be moved between workflows.
To see what this means, let’s look at our first step.
    steps:
    - uses: actions/checkout@v4
This starts our steps section. Steps in our workflow are indicated either with the uses keyword or with the name keyword (will see next).
If we use uses,, we are using a modular step which someone else has written and made available on the GitHub Actions Marketplace.
It then says that it uses actions/checkout@v4.
This is an action which checks out your project.
You can see the documentation to learn more about this action.
By specifying that this step uses the checkout action, we don’t have to write code to do the checkout ourselves.
Next, we want to get some info about the build. This is a custom step, so we give it a name and then give the shell commands we want.
    - name: Additional info about the build
      shell: bash
      run: |
        uname -a
        df -h
        ulimit -a
We then give this step a descriptive name. After we have checked out our code for CI, we run some bash commands to get some information about our build.
Next, we set up Miniconda. This is a common action that many people have to do in their workflows, so we’ve used an action that is available on the marketplace.
    # More info on options: https://github.com/marketplace/actions/setup-micromamba
    - uses: mamba-org/setup-micromamba@v1
      with:
        python-version: ${{ matrix.python-version }}
        environment-file: devtools/conda-envs/test_env.yaml
        condarc: |
          channels:
            - conda-forge
            - defaults
You can go to the specified URL to read more about this action.
Important again to note is that the keywords given in this step are specific to this action.
If we were setting this up ourselves, we would have had to find the action, read the documentation, and set up the options for the action to perform as we wanted.
You will see we are specifying the Python version as well as the environment file.
This environment file for testing is in our devtools folder, and we will return to it soon.
Before we discuss the rest of the steps, let’s consider how you might have found this action if CookieCutter did not set it up for you. We’ve already mentioned the “marketplace” several times in this tutorial, so let’s look at that. Navigate to marketplace.
The GitHub Marketplace is a place where you can find Actions and other apps that can be added to your repositories. If we are using GitHub Actions and there is a task we are trying to achieve, it’s a good idea to check the marketplace for it. Let’s find the Miniconda action by searching the marketplace. Search for “set up miniconda” in the marketplace.
If you search for this, you will find the action that we used. You can click on it to see the documentation.
Since we’re using a yaml file for our environment, let’s look at this file.
Open devtools/conda-envs/test_env.yaml in your text editor.
name: test
channels:
  - conda-forge
  - defaults
dependencies:
    # Base depends
  - python
  - pip

    # Testing
  - pytest
  - pytest-cov
  - codecov

    # Pip-only installs
  #- pip:
  #  - codecov
This is a YAML file just like our GitHub Actions file (remember we said YAML is commonly used for configuration files). This is a file that can be used to create a conda environment with specified packages. For this workshop, we created our environment by typing the command into the terminal. This could be inconvenient or impossible to reproduce if we have a lot of dependencies, so conda allows us to specify environments using a YAML file which can be passed on or reused.
We can see that this file specifies what packages will be installed in this environment.
There are the two base dependencies, python and pip, followed by dependencies specific to unit testing: pytest, pytest-cov, codecov.
The last few lines are commented out, but allow you to install certain packages via pip, instead of conda.
Sometimes, some dependencies are not available on any Conda channel but exist on PyPI.
Next, we installed our package in our environment as a development install.
We use conda list command to print the details of the environment.
This way, the installed packages will be in the GitHub Actions log file in case you need to check it.
- name: Install package

      # conda setup requires this special shell
      shell: bash -l {0}
      run: |
        python -m pip install . --no-deps
        conda list
After our package is installed, we run the test:
 - name: Run tests

   # conda setup requires this special shell
   shell: bash -l {0}

    run: |
      pytest -v --cov=molecool --cov-report=xml --color=yes molecool/tests/
Getting our CI to work#
Unfortunately, our CI runs failed, which can be seen from the red cross that appears after the last commit message on your main GitHub repository page. To know more about why this was the case, we have to read the GitHub Actions log files. Click on the red cross then click the Details link from one of the failing entries that marked with a red cross. The new page you will be redirected to has details about the job at the top and then the contents of the log file underneath. Look for red lines that indicate errors in your build.
==================================== ERRORS ====================================
__________ ERROR collecting molecool/tests/test_molecool.py __________
ImportError while importing test module '/home/runner/work/molecool/molecool/molecool/tests/test_molecool.py'.
Hint: make sure your test modules/packages have valid Python names.
Traceback:
/usr/share/miniconda/envs/test/lib/python3.9/importlib/__init__.py:127: in import_module
    return _bootstrap._gcd_import(name[level:], package, level)
molecool/__init__.py:8: in <module>
    from .functions import *
molecool/functions.py:9: in <module>
    import numpy as np
E   ModuleNotFoundError: No module named 'numpy'
Our tests failed because numpy could not be imported.
When we set up the dependencies, we did not explicitly write either numpy or matplotlib.
As such, when GitHub Actions creates and configures the machines where our CI runs, these packages are never installed.
We need to add them to the devtools/conda-envs/test_env.yaml file.
Add two lines to the test_env.yaml specifying numpy and matplotlib as dependencies that should be installed
in our CI environment.
Your test_env.yaml should look like this once you are done with your edits:
name: test
channels:
 - conda-forge
 - defaults
dependencies:
   # Base depends
 - python
 - pip

 # Package dependencies
 - numpy
 - matplotlib

 # Testing
 - pytest
 - pytest-cov
 - codecov

  # Pip-only installs
 #- pip:
 #  - codecov
After these edits, commit and push to the repository. GitHub Actions will now detect a new commit and will start a new build automatically. On your GitHub repository, click the Actions tab to see a new CI build running. After three to five minutes, you should see green checkmarks next to your build jobs. Congratulations! GitHub Actions is now set up and tracking your repository.
Tests, coverage, and much much more!
We finished setting up our CI workflow using the defaults included in the CookieCutter template. This is one way to do it, however, note that there are many ways you could have configured this workflow with the exact same effects. Similarly, you can use GitHub Actions to run more than just pytest. Several open-source projects use CI services to automate multiple steps of their development pipeline, namely style checking, unit testing, building documentation, and even building and uploading packages to conda and PyPI.
This repository is just for demonstration, so we probably do not want to actually waste resources running these tests every 24 hours.
Go to your CI.yaml file and remove the scheduled jobs.
You should remove the schedule keyword from your YAML file so that the on section matches below:
name: CI

on:
  # GitHub has started calling the new repo's first branch "main" https://github.com/github/renaming
  # Existing codes likely still have "master" as the primary branch
  # Both are tracked here to keep legacy and new codes working
  push:
    branches:
      - "master"
      - "main"
  pull_request:
    branches:
      - "master"
      - "main"
Code Coverage - Part II#
In the previous episode, we introduced the concept of code coverage as a measure of how much of our code is run by our unit tests. Projects should aim for a high coverage percentage, but not obsess over the number. Remember that even if your project has 100% coverage, it does not mean it is actually bug-free.
When we run pytest, we can get a summary of our coverage with the --cov=molecool option.
While this summary is helpful, it would be much more useful to know which lines are covered by our tests.
In the following section, we will explore two methods that allow us to do just that.
Assessing code coverage locally#
Besides coverage summaries, the pytest-cov module can also produce details reports.
Run the following command at the root of your project to generate a report in HTML format:
$ pytest -v --cov=molecool --cov-report=html
This command runs the tests as normal and in addition, creates a folder htmlcov that contains web pages highlighting the lines on each of our files that are covered by tests.
Go ahead and open the file htmlcov/index.html on your web browser.
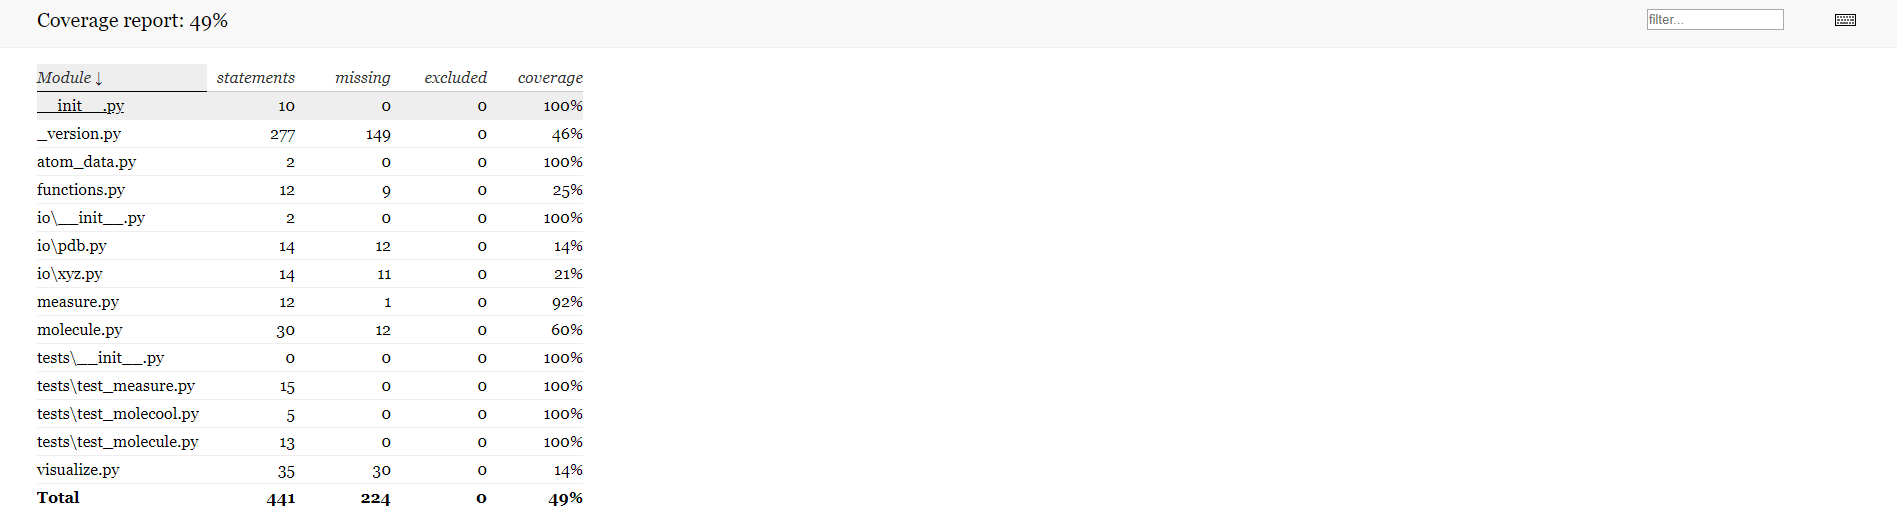
The report page shows all the modules in your project, along with the number of lines (statements). More importantly, it lists how many of these lines are not covered by tests (missing) as well as the coverage percentage. These percentages depend on how you wrote your functions and your tests, so don’t worry if those of the image above are slightly different.
Click on the measure.py file name to see exactly which lines are missing from our tests.
The colors indicate which lines are covered (in green) and which are not.
We can see that in our calculate_angle function, the return value in radians is never checked by our tests.
Let’s go ahead and fix that by writing a new test.
Exercise - Increasing Code Coverage#
Exercise
Write a new test in tests/test_measure.py to check that calculate_angle returns the
correct value when degrees=False. Then run pytest again to update the coverage report.
Solution
def test_calculate_angle_radians():
    """Test the calculate_angle function with output in radians"""

    r1 = np.array([1, 0, 0])
    r2 = np.array([0, 0, 0])
    r3 = np.array([0, 1, 0])

    expected_value = 90 * (np.pi / 180)

    calculated_value = molecool.calculate_angle(r1, r2, r3)
    assert expected_value == calculated_value
If you refresh the coverage page on your browser (or re-open it if you closed it before), you will see that measure.py now has 100% coverage.
Adding code coverage to your CI workflow#
Besides running tests for you, GitHub can interface with other services to help you get reports on code coverage. In this last section, we will introduce Codecov, one of many services that was created to help developers assess which areas of their projects lack sufficient test coverage. Codecov is free for open-source projects and integrates very nicely with GitHub.
On your browser, navigate again to the GitHub
Marketplace and this time, select the category Code quality.
Find and click on Codecov, and on the following page install the Open Source plan.
You can choose to add CodeCov to your account here, and you can choose either to add it to all repositories or to select repositories.
After going through the installation process, you will be redirected to codecov.io where you should log in with your GitHub Account.
Once on the Codecov web page, notice that molecool is already in your repositories and it already has results to show you. How is this possible?
The last line step of our CI.yml configuration file is a call to an executable called codecov.
The CookieCutter includes this utility program and sets it up automatically for us.
As a result, when our CI workflow runs successfully (all tests pass), GitHub Actions runs codecov, which sends statistics of our test coverage automatically to Codecov.io. Neat!
Back to the Codecov molecool report page, the sunburst plot gives a hierarchical view of our project and its coverage.
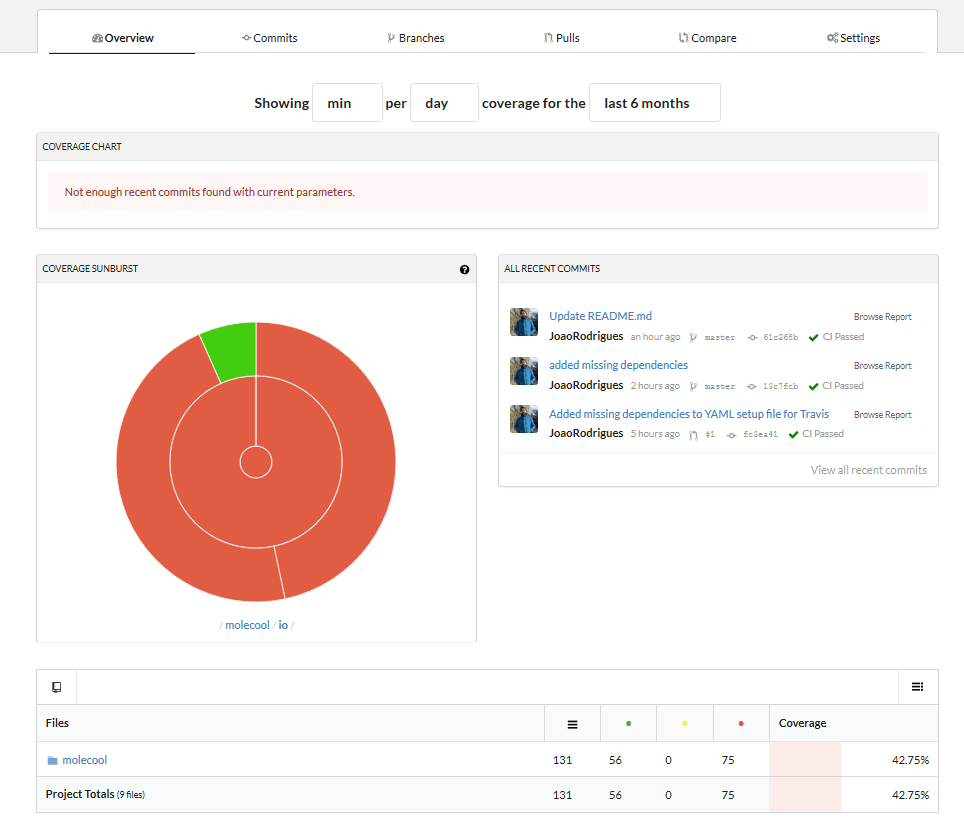
Red areas represent code that is poorly covered by our tests. On the right, you see the latest commits and can click on each one of them to see how they changed the overall coverage of the project. The bottom of the page shows a simple file-browser-like interface, much like the HTML page we obtained before.
Modifying the Workflow - Adding an Action#
A great feature of GitHub Actions is that they are modular. Anyone can make an action and it can be plugged into someone else’s workflow if it is available on the GitHub Marketplace. This means that if you ever need to do something which is something that may be commonly done, you should check the GitHub Marketplace to see if anyone has made this action before.
Let’s see how this works by adding a silly action to our workflow. Let’s say we want a job on our workflow to print some ASCII art in our GHA Log. Searching the GitHub Marketplace, you might find this action which generates ASCII art from text.
Exercise - Adding an Action to our Workflow
Implement this ASCII Art Action as another job in your workflow.
Make it print your package name. Note that this Action will only run on Linux systems.
This means you will want to change the runs-on keyword to an appropriate operating system.
This is not in the documentation, but you will see a failure of your job if you try to run on another operating system.
See if you can use some of GitHub’s built-in variables to print the package name or the username of the person who opened the pull request.
Solution
Here is the configuration to add the step. The added step is called ‘welcome’. We show more of the yaml file than necessary to demonstrate placement.
jobs:
  welcome:
    name: Welcome the user with ASCII art
    runs-on: ubuntu-latest
    steps:
     - uses: mscoutermarsh/ascii-art-action@master
       with:
          text: '${{ github.event_name }} from ${{ github.actor }}'

  test:
    name: Test on ${{ matrix.operating-system }}, Python ${{ matrix.python-version }}
    runs-on: ${{ matrix.operating-system }}
    strategy:
      matrix:
        operating-system: [macOS-latest, ubuntu-latest, windows-latest]
        python-version: [3.8, 3.9]
If you push this, you should see an additional job under your CI workflow where you can see molecool displayed as ASCII art.
Note that you could have also used GitHub’s built-in environment variables to print this
  welcome:
    name: Welcome the user with ASCII art
    runs-on: ubuntu-latest
    steps:
     - uses: mscoutermarsh/ascii-art-action@master
       with:
          text: '${{ github.repository_name }}'
A GitHub Action can be made and used by anyone. You can even see this guide from GitHub on creating actions.
Key Points#
Key Points
Continuous integration automates development steps, such as testing, coverage, and packaging.
Continuous integration also allows you to test your code on a variety of operative systems and platforms.
The CookieCutter includes (almost) ready-to-use configuration files for GitHub Actions.
You can find GitHub Actions steps and other services in GitHub Marketplace.